
We'd value your feedback. Click here...
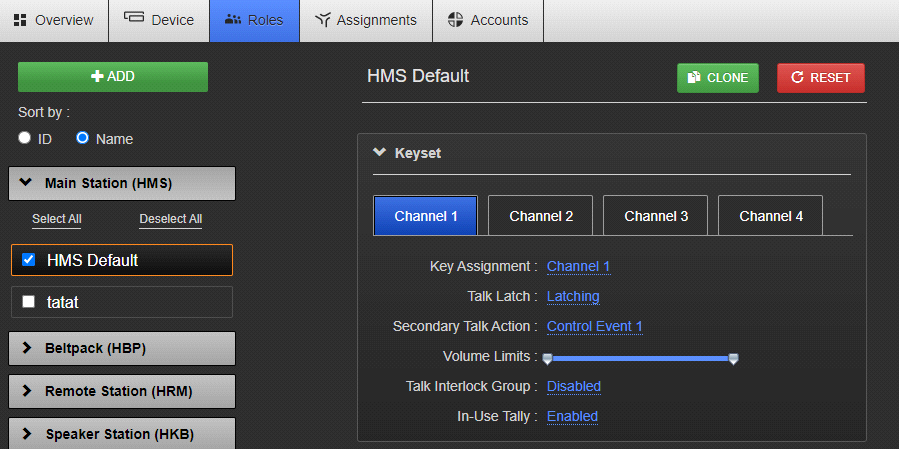
Editing the Keyset
HelixNet user stations have have two or four Keysets, which can be assigned to a Channel. The Keyset contains the user controls for the assigned Channel. You can configure:
Key Assignment: which Channel is assigned to the Keyset
Talk Latch :set the behavior of the talk key to be; latching, non-latching, permanently latched, disabled
Secondary talk action: an action triggered when a talk key is pressed. Commonly used to send a call signal.
Volume limits: prevent the intercom user from setting the volume either too low to hear, or too high ( causes an accoustic problem).
Talk Interlock Group: a group of keys in which only one talk key can be pressed at any one time.
In -Use Tally: shows a visual indication whenever someone talks on a channel.
-
From the drop-down list of Roles, select the Role you wish to edit.
-
Select Keyset.
-
Select the Keyset you wish to edit.
-
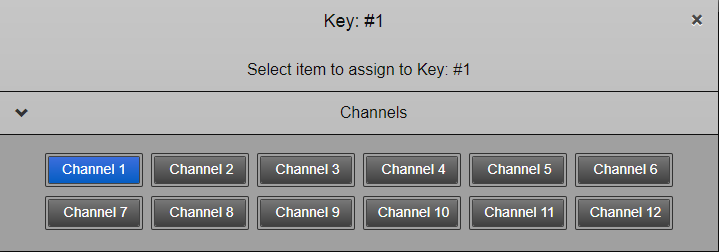
To assign a different Channel to the key, click Key Assignment.
-
Select the Channel you require. A Channel is highlighted blue when it is selected. This selection toggles on and off.
-
To configure Talk key operation, click Talk Key, and select Latching (default), Non-Latching, Disabled or Permanent Latch.
Permanent Latch is used to ensure that a key is always latched. The latch will persist over power-cycles and Remote Mic Kill (RMK). Permanent Latch is most commonly used with an HS6 handset or headsets that use an inline switch.
-
Repeat the above steps for each Keyset.
Secondary Talk Action
| Talk action setting | Result |
|---|---|
| Unassigned | No action |
| Call | A call signal is sent to the Channel |
| Control Event 1 |
Control Events are only for use in HelixNet systems that are linked with LQ. A Control Event will send a control signal to any LQ GPIO or IVC port that is in the same Channel as the key that sends the Control Event. See Networked Control Events in the LQ Series User Guide for more information. Control Events are commonly used to open a talk route to a two-way radio. |
| Control Event 2 | |
Talk Interlock Group
An Interlock group allows you to create a group of keys on your intercom station where only one talk key in the group can be active at any one time. This feature can be used when a speaker needs to move quickly between different audio channels with the assurance that only one Channel is active at any given time.
For example:
A stage manager has 4 keys set up as an Interlock group: Production, Lighting, Audio, Front of House. He has a permanent latch configured on the Production Channel and uses a footswitch connected to the Station's GPI to control the Mic button. When he presses the key for Front of House, the Production key will unlatch and he will not talk to that Channel. When he releases the Front of House key, the Production permanent latch will resume.
Interlock groups can be applied selectively to Keysets: Main Stations, Remote Stations (including expansion panels), desktop units and beltpacks. One interlock group per intercom station.
Interlock groups can be set up either in the CCM or in the front panel menus.
| Note: | When a permanent latch is included in a talk interlock group, the talk key will temporarily over-ride the permanent latch. Do not put more than one permanent latch key in the same talk interlock group . |
How to set up an interlock group (CCM)
For each key you wish to include in the interlock group, set the Talk Interlock Group option to Enabled.