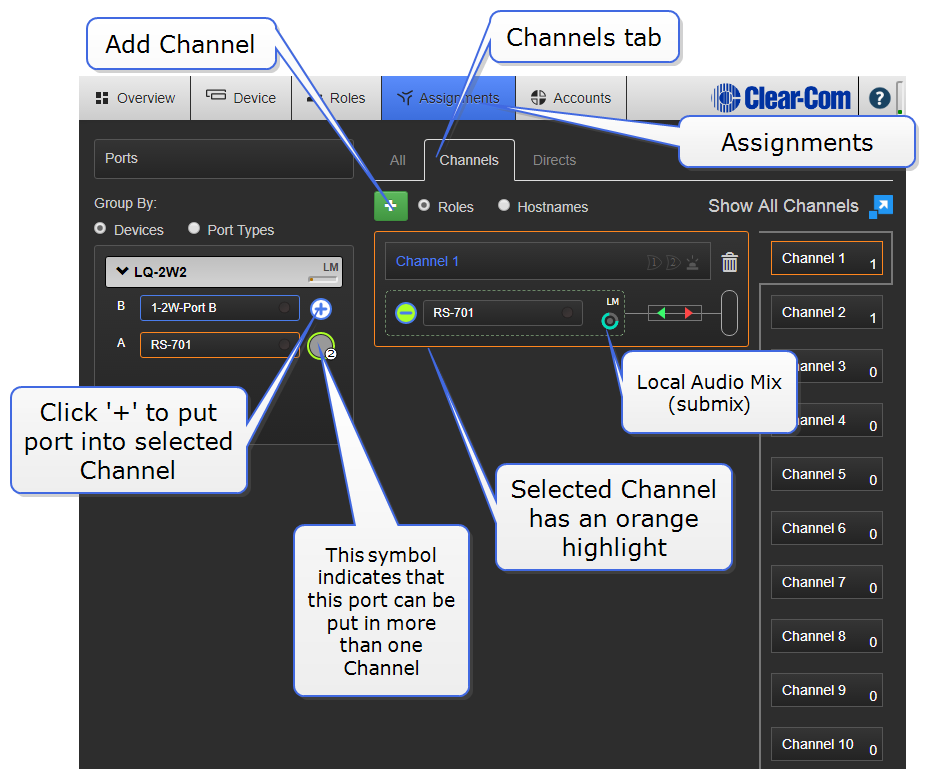
Assignments
Network transmission controls/transport settings are in this page (LQ only).
This is where you will assign ports to Channels. All devices, with their associated ports appear in the left margin of this page.
In the center are three tabs; chose from All, Channels and Directs.
Channels (up to 24 in total per Link-Group) are shown on the right.
To route audio:
- Choose Channel type; Channel or Direct.
- Click on an available Channel to select it or click '+' to create a new one.
- With the Channel selected (orange highlight), click '+' next to the port you require to put into the Channel.
- Repeat step 3 as often as required.
|
Note:
|
Network transmission controls (submix) are in this page. |
An LQ Channel is made up of multiple audio sources which operate as a partyline. All sources in a Channel can hear and talk to each other. A 4-wire direct (panel) Channel, by contrast, is a connection between two ports only. A 4-wire direct (panel) connection cannot be included in a Channel and is configured separately.
|
Note:
|
Direct Channels are not available in a HelixNet system. |
Each LQ device within a Channel performs its own local audio mix (submix). The LAM mixes audio at a very early stage of the audio transport which reduces the latency of the audio streams (below 4ms) and improves audio processing. LAM is a way of improving latency, increasing the capacity of an LQ device in certain user cases and reducing network usage.
The LAM is performed automatically when ports are added to a Channel.
|
Note:
|
The ports from each LQ appear within a box, with the local audio mix icon in the bottom right corner, where you can program network settings. |
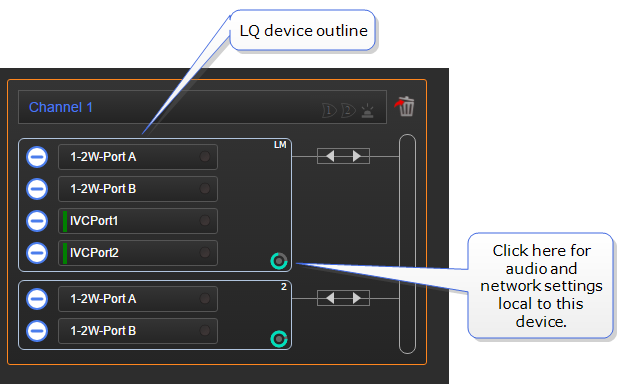
Network settings within a Channel are set on a per-device basis. To set differing network quality for ports from the same device, put the ports in separate Channels.
|
Note:
|
LAM is not available if you are using a HelixNet/LQ Link-Group. |
Click/touch a blue label in the CCM to access settings.
Silence suppression. Default = Disabled
Enabling this option will stop transmission and implement comfort noise when silence is detected. This is done to conserve network resources.
- Internet - very low or low
- LAN/WAN - balanced or high
- LAN only - very high. This option enables 20 kHz bandwidth.
The Custom option allows adjustment of the jitter buffer setting independent of bit rate and packet size.
The jitter buffer setting is designed to buffer audio received to prevent loss if there is network jitter. Note that the jitter buffer selection will directly affect the latency. This is because the lower number in the jitter range represents the amount the LQ unit will buffer audio before delivering it to the port. A bigger jitter buffer setting will increase latency in milliseconds.
|
Note:
|
The network setting is the bandwidth from the LQ device into the IP network. |
|
Note:
|
Within the Custom setting, selecting an Audio Bitrate of 128 Kbps will automatically set Bandwidth to 20 kHz, |
| Transmit
|
|
| Audio bitrate |
16, 32, 48, 64, 128 Kbps |
| Audio bandwidth |
12, 20 kHz |
| Packet size |
60, 40, 20, 10, 5 ms |
| Receive
|
|
| Jitter (min-max) |
60-200, 40-100, 20-60, 5-60, 3-60 ms |
| Unit latency |
80-220, 60-120, 40-80, 25-80, 23-80 ms |